Getting Started with FloSync
FloSync installs like any other desktop app on macOS or Windows, and it detects your connected screens on its own. Within a few minutes you can have video playing full screen across all of them.
Installation
macOS
- Download the FloSync DMG file from the download page
- Open the DMG and drag FloSync to your Applications folder
- Launch FloSync from Applications
Note: On first launch, macOS may ask you to confirm you want to open an app from an identified developer. Click "Open" to proceed.
Windows
- Download the FloSync installer from the download page
- Run the installer and follow the prompts
- Launch FloSync from the Start menu or desktop shortcut
First Launch
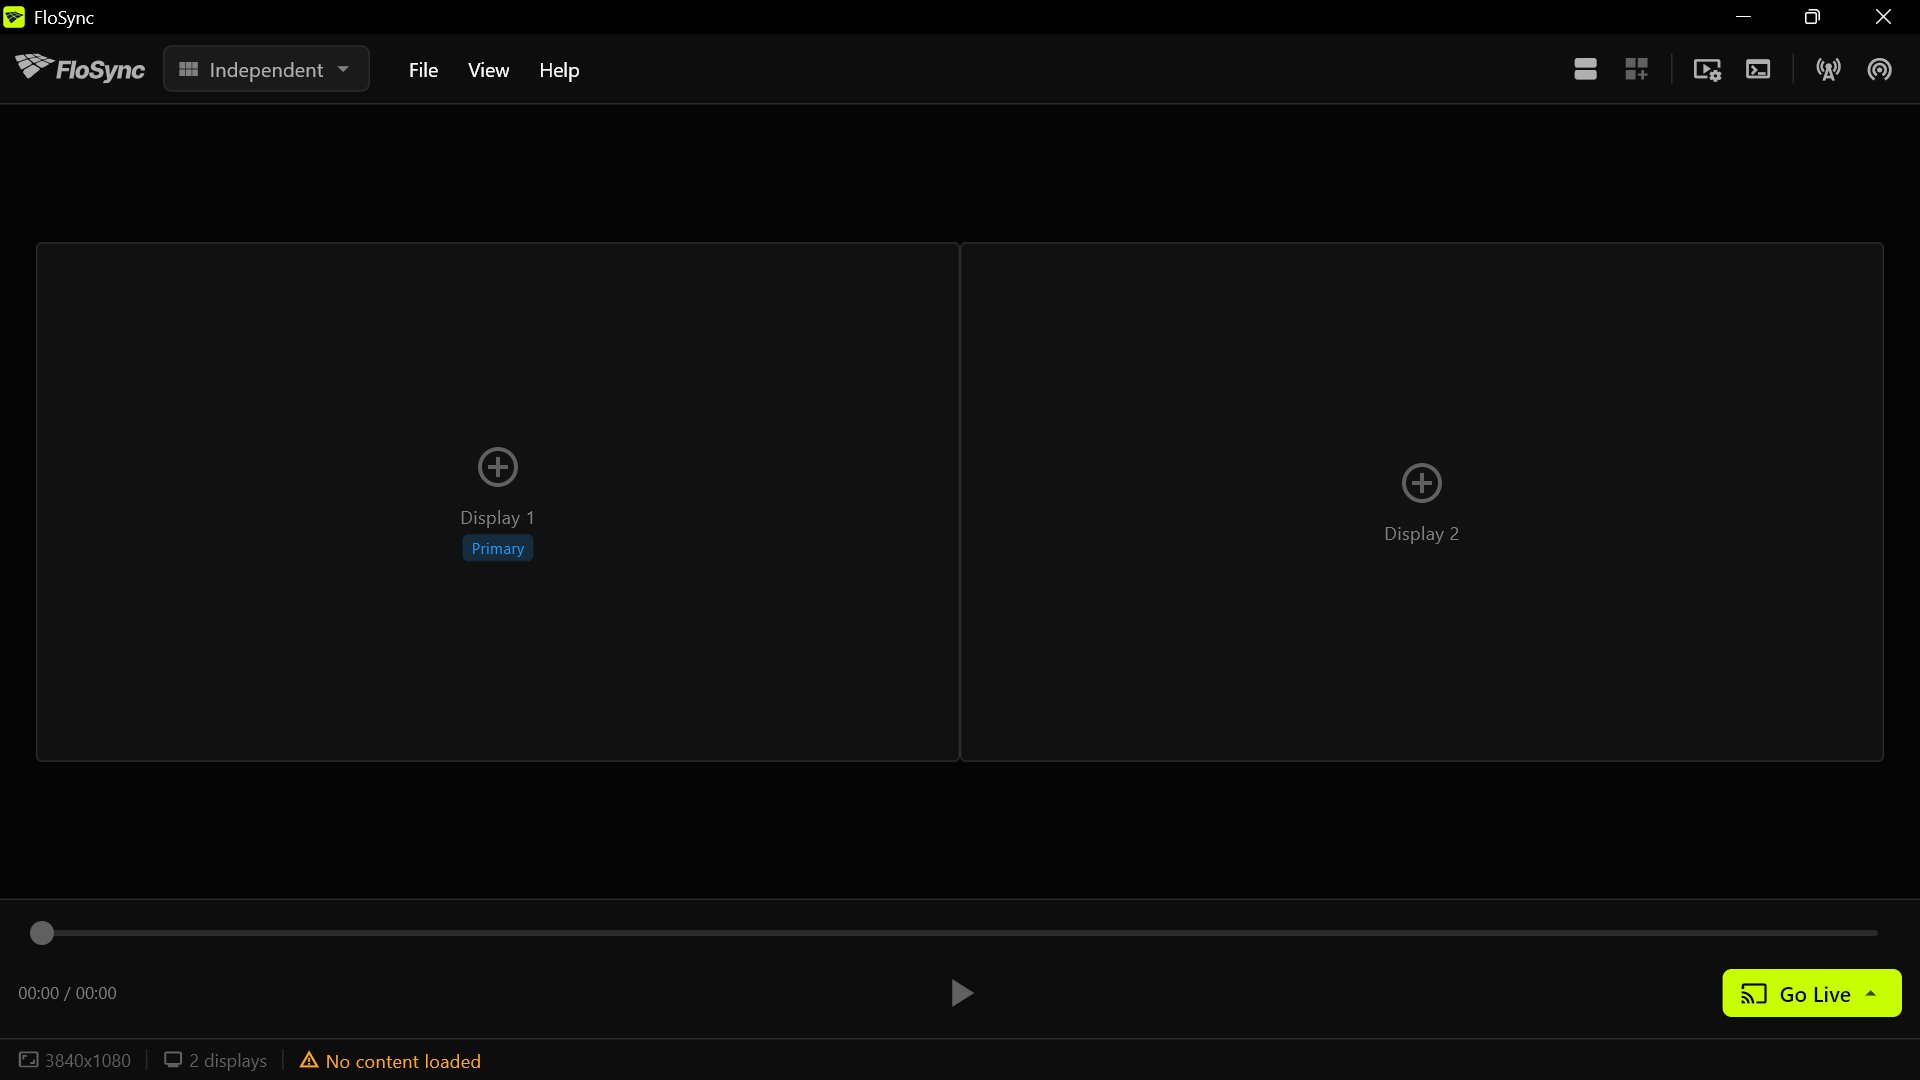
The first time you open FloSync, it also opens a short welcome page in your browser. The app itself shows the main control panel interface:
 1234
1234
Interface Overview
The FloSync interface is a unified control panel divided into several areas:
1. Top Bar
- Mode dropdown - Switch between Independent, Mirrored, and Spanned modes
- LIVE indicator - Shows when presentation mode is active (red badge)
- Schedule icon (agenda/list) - Open/close the schedule panel for time-based and interval content scheduling
- Global Canvas Extension icon (grid) - Configure Global Canvas for multi-computer video walls (Spanned mode only)
- Global preview toggle (zoom) - Show/hide the global canvas preview (Spanned mode only, when extension is configured)
- (divider)
- Transcode icon (video controls) - Open/close the transcode panel for converting videos to sync-friendly formats
- Sync Log icon (terminal) - Open/close the sync log panel, a live view of sync activity
- (divider)
- Server icon (tower) - Start/stop server mode for network sync (green when active)
- Client icon (Wi-Fi) - Connect/disconnect as client for network sync (blue when active)
2. Screen Arrangement Area
- Shows a visual representation of your connected screens
- Each screen appears as a box proportional to its actual size and position
- Drag and drop videos or images directly onto screen boxes
- Right-click for additional options (load web page, load HTML file)
- Click screens to select them
- Click loaded content to edit its settings
- Audio toggle button on each screen (videos only)
3. Playback Controls Bar
- Timeline slider - Scrub through the video (visible when video content is loaded)
- Time display - Current position and total duration
- Play/Pause button - Control video playback
- Go Live button - Launch fullscreen presentation on all screens
4. Status Bar
- Canvas size - Total dimensions of all screens combined (e.g., "3840×1080")
- Global canvas size - When canvas extension is configured, shows the full video wall size
- Screen count - Number of connected screens
- Warnings - Any issues with your setup (missing content, duration mismatch, etc.)
- Sync corrections - Number of sync corrections during live mode (only shown when live)
- Network sync status - Shows server/client connection status when active
- Video duration - Length of the longest loaded video
Loading Content
FloSync supports three content types: videos, images, and web pages. Each type has different loading methods and behaviors.
Loading Videos
Drag and Drop: Simply drag a video file from Finder (macOS) or Explorer (Windows) and drop it onto any screen box in the FloSync control panel.
Click to Browse:
- Click on any screen box in the arrangement area
- Choose Video / Image in the Add Content dialog
- Select your video file and click Open
Supported Video Formats:
- MP4 (H.264, H.265/HEVC)
- MOV (including ProRes)
- MKV
- AVI
- WebM
- M4V
- WMV
- FLV
In Mirrored or Spanned mode, loading content on any screen automatically loads it on all screens. In Independent mode, each screen can have different content.
Loading Images
Drag and Drop: Drag an image file from your file browser and drop it onto any screen box.
Click to Browse:
- Click on any screen box
- Choose Video / Image in the Add Content dialog
- Select your image file and click Open
Supported Image Formats:
- PNG
- JPG / JPEG
- GIF (including animated GIFs - they will loop automatically)
- BMP
- TIFF
- WebP
- SVG
Image Fit Modes: After loading an image, click on it to open the content settings dialog where you can adjust:
- Fit - Scale to fit within screen, maintaining aspect ratio (may show bars)
- Fill (default) - Scale to fill screen, cropping excess (no bars, may crop)
- Stretch - Stretch to fill screen (may distort aspect ratio)
Loading Web Pages
From URL:
- Right-click on a screen box
- Select "Load Web Page URL..."
- Enter an HTTPS URL (e.g.,
https://example.com) - Click Load
From Local HTML File:
- Right-click on a screen box
- Select "Load HTML File..."
- Browse to and select your HTML file
- Click Open
Note: The URL field accepts
https://addresses, and assumeshttps://if you type a bare address likeexample.com. Local HTML files can reference relative assets (CSS, images, JS) in the same directory.
Auto-Refresh: After loading a web page, click on it to open settings where you can configure auto-refresh:
- Never (default)
- Every 15 minutes
- Every 30 minutes
- Every hour
Playing Your Content
Once content is loaded, you have two ways to display it:
Preview Mode (Control Panel)
Use the playback controls in the control panel to preview your content:
- Play/Pause button - Click the play button in the bottom bar (videos only)
- Timeline scrubbing - Click and drag on the timeline to jump to any position (videos only)
- Audio toggle - Click the speaker icon on each screen to enable/disable audio (videos only)
Note: Images display immediately and stay visible indefinitely. Web pages render live in the preview. Playback controls only affect video content.
Go Live (Fullscreen Presentation)
For actual presentation, use the Go Live feature:
- Click the Go Live button in the playback controls bar
- FloSync creates fullscreen windows on each connected screen
- Content displays on each screen according to your configuration:
- Videos stay visually aligned across all screens
- Images display immediately
- Web pages render live
- If network sync is active (server or client mode), video playback will be synchronized across all connected computers
During Live Mode:
- The mouse cursor is hidden by default on fullscreen windows
- Moving the mouse reveals the cursor temporarily
- The cursor auto-hides again shortly after inactivity
- Clicking on a fullscreen window exits live mode
Exiting Live Mode:
- Press ESC in any fullscreen window to exit live mode
- Click anywhere on a fullscreen window
- Or click the Stop Live button in the control panel
Go Live Options: The Go Live button opens a dropdown. With a configured schedule (multiple scenes), it includes:
- Go Live (Current): Plays the current composer content, ignoring the schedule. Use this for testing only.
- Go Live (Schedule) or Go Live (Beginning): Plays scheduled content with automatic transitions. Use this for real deployments.
For details on scheduling modes and the Controller option, see Scheduling.
Working with Multiple Screens
If you have multiple screens connected to your computer, FloSync automatically detects them and shows them in the screen arrangement area.
Screen Arrangement
The center of the control panel shows your connected screens arranged as they are configured in your operating system. The layout is proportionally scaled to show relative positions and sizes.
Display Modes
Use the Mode dropdown in the top bar to choose how content appears across your screens:
- Independent - Each screen can show different content with separate audio (default mode)
- Mirrored - All screens show the same content in sync (primary screen audio only)
- Spanned - Your content stretches across all screens as one large canvas (primary screen audio only)
For detailed information about each mode, see Display Modes.
Menu Bar
FloSync provides full menu bar access on both platforms:
macOS: Native menu bar with standard keyboard shortcuts
- FloSync menu - About FloSync, Preferences... (⌘,), Hide, Quit
- File menu - Import/Export Configuration... (⌘O/⌘S), Reset All Scenes & Content
- View menu - Schedule Panel, Log Panel, Global Canvas Preview
- Window menu - Minimize, Zoom
- Help menu - FloSync Documentation, FloSync Website, FloSync on Reddit, Check for Updates, Report an Issue, Open Log Folder
Windows: In-app menu bar at the top of the window
- File menu - Import/Export Configuration... (Ctrl+O/Ctrl+S), Reset All Scenes & Content, Settings... (Ctrl+,), Exit (Ctrl+Q)
- View menu - Schedule Panel, Log Panel, Global Canvas Preview
- Help menu - FloSync Documentation, FloSync Website, FloSync on Reddit, Check for Updates, Report an Issue, Open Log Folder, About FloSync
Saving and Loading Configurations
FloSync can save your complete setup to a .flo file, which you can later import to restore your configuration. This is useful for:
- Backing up your schedule and content assignments
- Deploying the same configuration to multiple computers
- Sharing setups with colleagues
Exporting a Configuration
- Go to File > Export Configuration... (⌘S on macOS, Ctrl+S on Windows)
- Choose a location and filename
- Click Save
What's exported:
- All schedule scenes and their content assignments (both Time-of-Day and Interval schedules), including any MIDI mappings you've added to Interval scenes
- Display mode (Independent, Mirrored, or Spanned)
- Global canvas extension settings
- Audio settings (per-display mute states)
- App version and format version (for compatibility checking)
Content assignments point at your media files rather than embedding them, so when you move a configuration to another computer, copy the video and image files across as well.
What's NOT exported (preferences, which stay on the machine they were set on):
- Sync tolerances (local and network)
- Window position and size
- UI panel visibility
- Other preferences, such as launch-at-login
Importing a Configuration
- Go to File > Import Configuration... (⌘O on macOS, Ctrl+O on Windows)
- Select a
.flofile - Click Open
Version Compatibility: If the file was created by a newer version of FloSync, you'll see a warning dialog asking whether to proceed. This helps prevent issues when importing configurations that may use features not available in your version.
Missing Files: If some content files have been moved or renamed since the configuration was exported, FloSync will show a dialog listing the missing files. You can:
- Click Search Folder... to search a folder for all missing files at once
- Click Locate Files... to select specific files manually
- FloSync matches files by filename and verifies them by size and content hash when available
Resetting Scenes and Content
To clear all content and start fresh:
- Go to File > Reset All Scenes & Content
- Confirm in the dialog that appears
This clears:
- All schedule scenes, in both Time-of-Day and Interval modes
- Content assignments for each display
- Global canvas extension settings
Your preferences (sync tolerances, etc.) are preserved.
Note: Import and Reset are disabled while in Live mode. Exit Live mode first.
For a full reset that also clears preferences and logs, see the Danger Zone section in Preferences.
Quick Tips
- ESC to exit: Press ESC in any fullscreen window to exit live mode
- Drag to replace: If content is already loaded, drag new content onto the screen to replace it
- Loop playback: Videos automatically loop - perfect for digital signage
- Clear all content: Right-click the screen arrangement area and choose Clear All Content
- Persistent sessions: FloSync remembers your last loaded content and restores it on next launch
- Audio per screen: In Independent mode, each screen has its own audio toggle (videos only)
- Content settings: Click on loaded content to adjust fit mode (images/videos) or URL/refresh (web pages)
- Right-click menus: Right-click screens to load content, or right-click scene cards in the schedule panel for quick editing options
- Animated GIFs: GIF images loop automatically - no configuration needed
What's Next?
Now that you know the basics, explore these guides to get more out of FloSync:
- Display Modes: when to use Independent, Mirrored, or Spanned mode, and how to set up multi-computer video walls
- Scheduling: time-of-day and interval-based scene rotations with automatic transitions
- Go Live: fullscreen presentations, Controller mode, keyboard controls, and scene transitions
- Network Sync: synchronizing video playback across multiple computers on your network
- MIDI: using MIDI controllers for direct scene triggering
- Video Preparation: how to optimize your video files for the smoothest possible sync